Extensions are valuable tools that can enhance the functionality of Adobe Creative Cloud applications, such as Premiere Pro, Photoshop, and Illustrator. In this tutorial, we will use the AI Background Remover Extension as an example to show you how to update your Creative Cloud plug-ins:
Updating Creative Cloud Extensions using the Creative Cloud Desktop App:
Before you start updating the extension, it’s important to close all Adobe applications that may be using the extension. This ensures that the update process can be completed without any conflicts.
Step 1: Open the Creative Cloud Desktop app
Next, open the Creative Cloud Desktop app on your computer. This app serves as a hub for managing all your Creative Cloud applications and extensions.
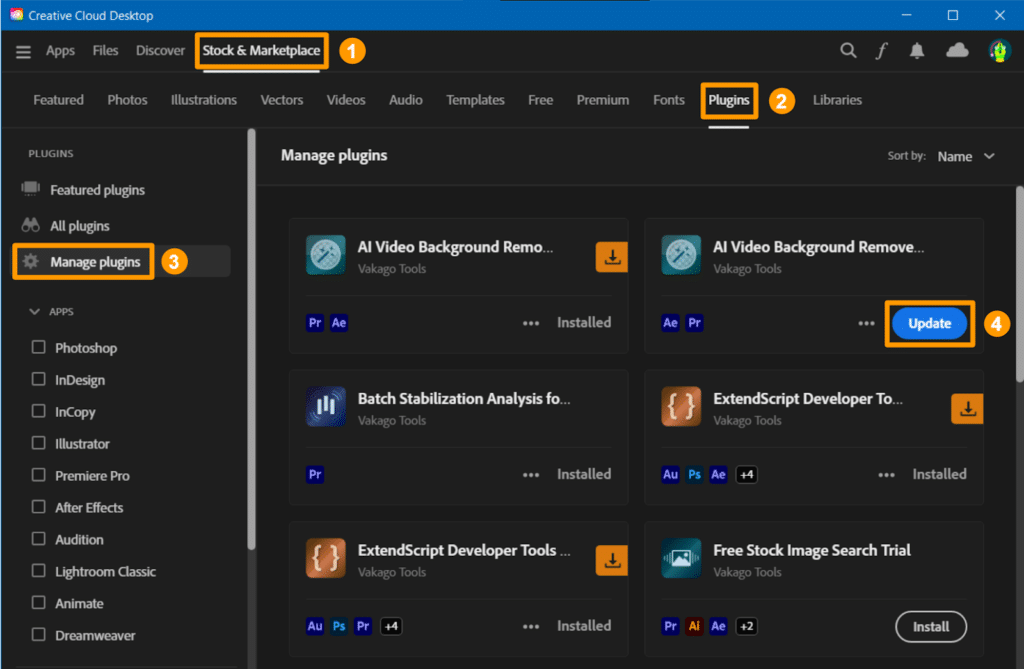
Step 2: Go to the Stock & Marketplace tab, and then select Plugins.
In the Creative Cloud Desktop app, navigate to the Stock & Marketplace tab. Here, you will find a list of available plugins and extensions.
Step 4: Select “Manage plugins”
In the Plugins section, locate the plugin that you want to update, in this case, we will use the AI Background Remover Extension as an example. Click on “Manage plugins” from the side panel menu.
Step 5: Look for the respective plugin and select “Update”
In the Plugins management window, you will see a list of all the extensions and plugins installed on your system. Look for the Extension and click on the “Update” button next to it. This will initiate the update process for the extension.
If you do not find the extension in “Manage plugins,” you can manually search for it by clicking on “All plugins” and using the search bar to look for the extension by name.
Troubleshooting:
If the update fails, there are a few steps you can take to troubleshoot the issue. First, make sure that you are logged in as an administrator on your computer. Some updates may require administrative privileges to be installed successfully. Next, try restarting your computer. In some cases, you may have to try uninstalling all old versions of the extension first.
If you are still unable to update or install the extension via the Creative Cloud Desktop app, you can manually install the extension by downloading the ZXP file from Adobe Exchange. To do this, you can follow the instructions provided at https://vakago-tools.com/get-zxp-file-from-adobe-exchange/. Once you have downloaded the ZXP file, you can install it manually using ZXP Installer or any other third-party ZXP installer.
Updating your Creative Cloud extensions ensures that you have access to the latest features and improvements. By following the steps above, you can easily update your extensions and keep your Adobe Creative Cloud applications running smoothly.